FAQs
DYMO Stamps is not yet compatible with Windows 8, but will be compatible with the next update.
Click Here
The Intelligent Mail barcode is USPS barcode technology used to sort and track letters and flats. Intelligent Mail barcode technology combines the capabilities of the POSTNET barcode and the PLANET Code barcode into one unique barcode. DYMO Label Software version 8 automatically utilizes Intelligent Mail barcodes in address templates on labels with the minimum length 3 1/2" (e.g. 30251, 30252). However, if you prefer to print your address labels without it, you can also remove it by choosing 'None' under Intelligent Mail barcode in 'Address Object Properties'.
You can pay for postage using VISA, MasterCard, Amex, Discover or Diner's Club or with a direct deduction from your checking account. Postage can be ordered in $10 increments.
In list view, select the contacts to place in the same category. UseShift+clickto select a series of contacts. UseCtrl+clickto select non-sequential contacts. Choose Categories and click on the Assign option or pressCtrl+r . The Assign Categories dialog will appear. Select categories by clicking their checkboxes. Click OK to assign the selected categories and close the Assign Categories window.
Each time you open the application, DYMO Stamps checks for updates and alerts you if a new version is available. When a USPS rate change occurs, you will automatically be prompted to download an update once the new USPS rates have gone into effect.
The Label and Tape editors are combined into one editor in v8. You now design tape labels in the same manner and using the same label objects as die-cut labels. Click on the Labels tab and choose the label type you want to use visually by shape and size.
Yes, the CardScan SDK includes several examples, including two sample programs that demonstrate how to use the SDK from Visual Basic and VB.NET.
Updating drivers manually for LabelWriter ® on Windows
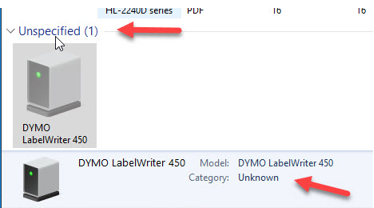
If the LabelWriter appears under unspecified on Windows in Devices and Printers, usually the computer has not identified that device as a printer yet.
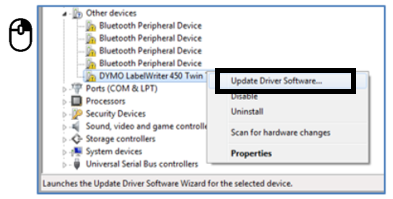
- Go to Control Panel>Hardware and Sound>Device Manager.
- Select View>Show Hidden Devices
- The LabelWriter should be listed under Other Devices, Printers or Software category.
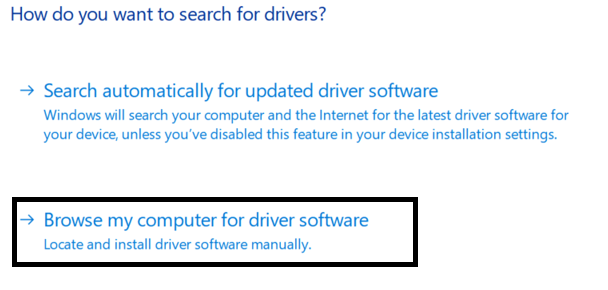
- Right-click on LabelWriter and select Update Driver Software….
- In the next window, pick Browse my computer for driver software.
- Click the Browse… button and point to one of the folder locations depending on the DYMO software you are using:
A. DYMO Connect:
For 64-bit systems: C:\Program Files (x86)\DYMO\DYMO Connect\Drivers For 32-bit systems: C:\Program Files\DYMO\DYMO Connect\Drivers
B. DYMO Label v.8:
For 64-bit systems: C:\Program Files (x86)\DYMO\DYMO Label Software\Drivers For 32-bit systems: C:\Program Files\DYMO\DYMO Label Software\Drivers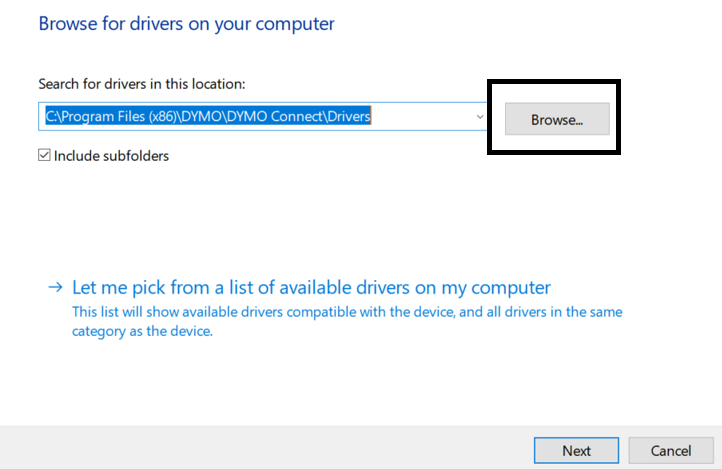
- Click ‘Next’ and you should receive a notification that Windows has successfully performed the task. If you are receiving any error messages at this point, please contact us.
- On some versions of Windows the printer will still show the DYMO under Unspecified even though in Device Manager it appears under Printers. However, you should still be able to print. It’s a Windows glitch, and restarting Windows often resolves that.
Click Start, select Run, enter CMD, and click OK . At the command prompt, change to the directory where the DYMO Label software installer is located. Enter the name of the DYMO Label software installer and add the appropriate switch command and pressEnter .
Open CardScan, click Edit and select Preferences . Click on Scan and uncheck Detect Cards Automatically. Click OK.
In a single CardScan database (*.cdb), for Windows NT,98,2000,ME,XP/Vista/7 the limit is approximately 15,000 cards.
Run the CardScan program. Choose New from the File menu in CardScan. Choose Save As from the File menu in CardScan. Give this file the name Blank. Click on Save. Click on your Windows Start Button. Choose Programs.Choose CardScan. Choose PalmPilot Conduit Setup or Conduit for PalmPilot. Click on Browse. Search for and double click on the file named Blank.cdb. Select a Two-Way Synchronization. (In CardScan version 3.0.6 or later, this option will be listed in the Advanced or Synchronization section). Click on Ok. Place your PalmPilot in its cradle, and HotSync. You will begin to see the address information appear in CardScan. Once this has completed, bring up the CardScan program, and click on any one of the entries. Choose Select All from the Edit menu. Choose Delete from the Card menu. Your entries in CardScan will have been deleted. HotSync your PalmPilot, and your Address Book will have been cleared.